Walkthrough: Create a Connector in the Clinic Frontend
A Connector links the local clinic frontend to a data source, for example a CSV file, Excel file, local database, FTP/SFTP source, or custom extraction function. In FLNet, connectors are created inside the local clinic frontend, not in the global server.
The connector is the local ETL process for a cohort. It extracts data from a local source, transforms it into the structure expected by a selected schema, validates the result, and makes the harmonized data available for local queries, cohort statistics, and federated training requests. The source data remains inside the clinic environment.
Before creating a connector, three concepts are important:
| Concept | Meaning |
|---|---|
| Cohort | A local collection of patients or records managed together. A cohort represents the local data group that can later be queried, inspected, used for statistics, or used in federated learning. |
| Schema | The semantic and technical structure that the cohort data must follow. A schema combines ontology nodes, datatype nodes, and schema nodes. Ontology nodes describe biomedical meaning, datatype nodes define technical validation rules, and schema nodes organize these definitions into a usable data structure. |
| Connector | The ETL configuration attached to a cohort. It defines how local source data is imported, mapped to the selected schema, validated, and made available inside the local clinic node. |
Step 1 — Open the Local Cohort Overview
Navigate to the local clinic frontend and log in with your clinic-local account. Make sure you are working in the * Local App*, not the global frontend.
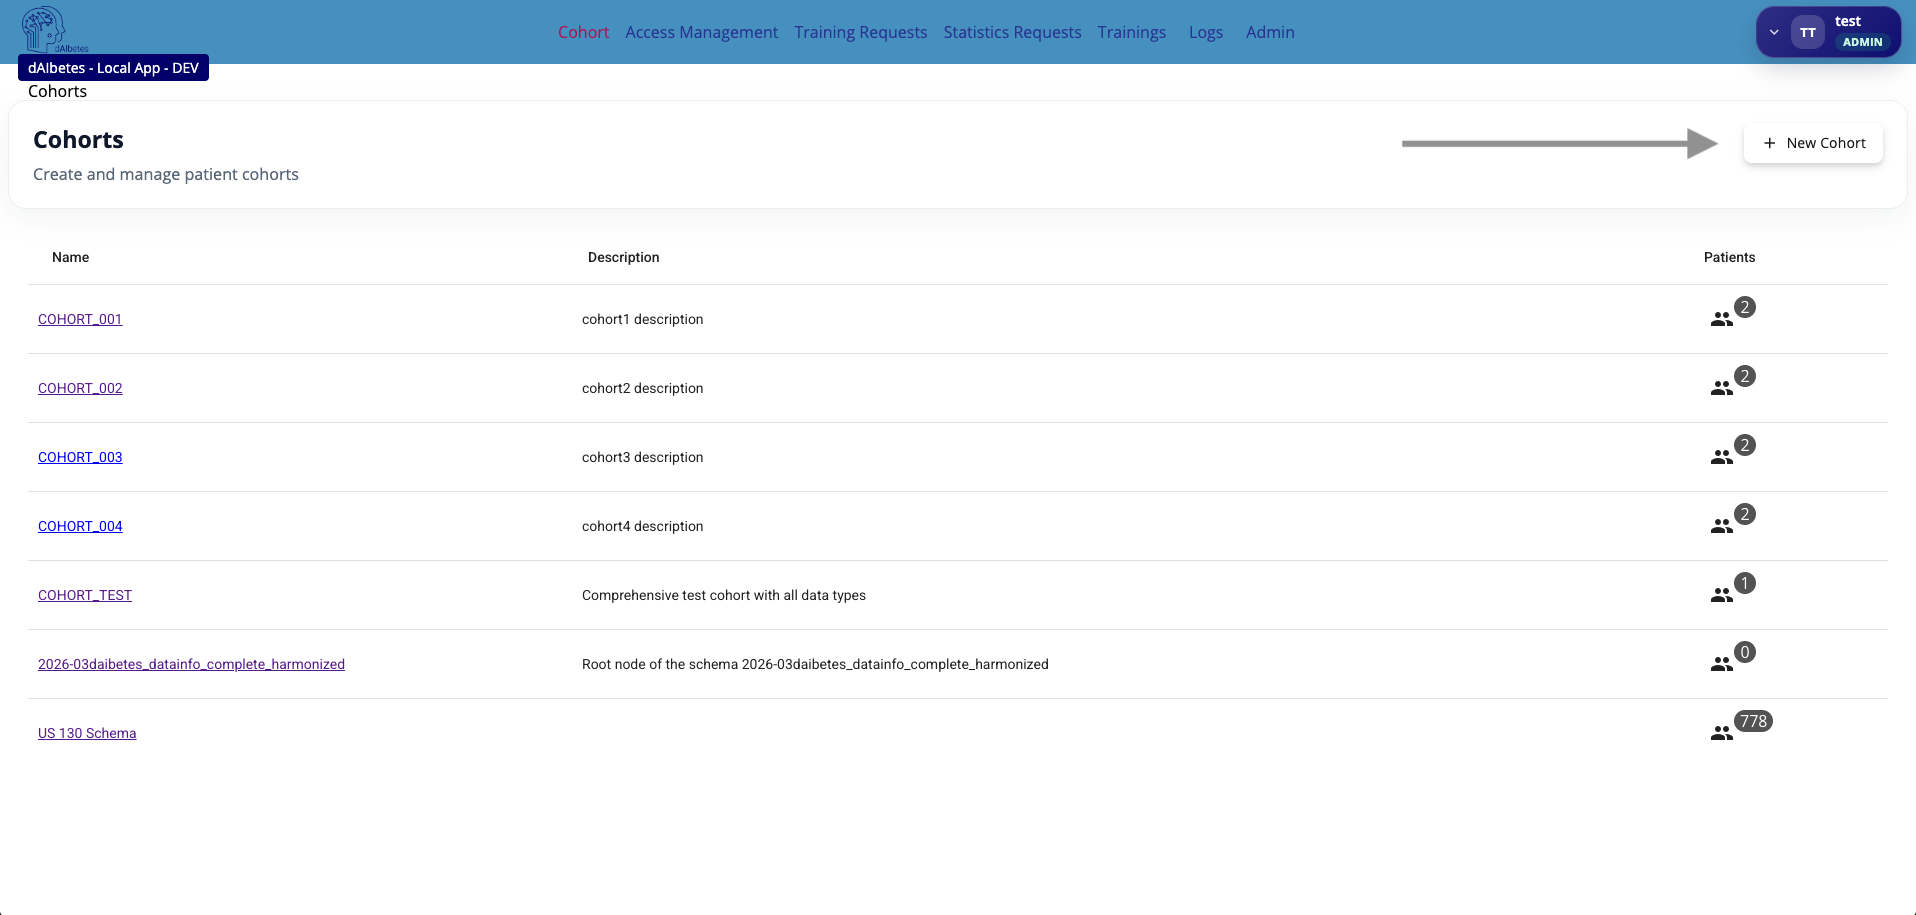
Open the Cohort section. The cohort overview shows all cohorts available on the local clinic node. Each row shows the cohort name, description, and the current number of associated patients.
Use New Cohort when you want to create a new local data group that will later receive data through a connector.
Step 2 — Create a Cohort and Open the Connector Wizard
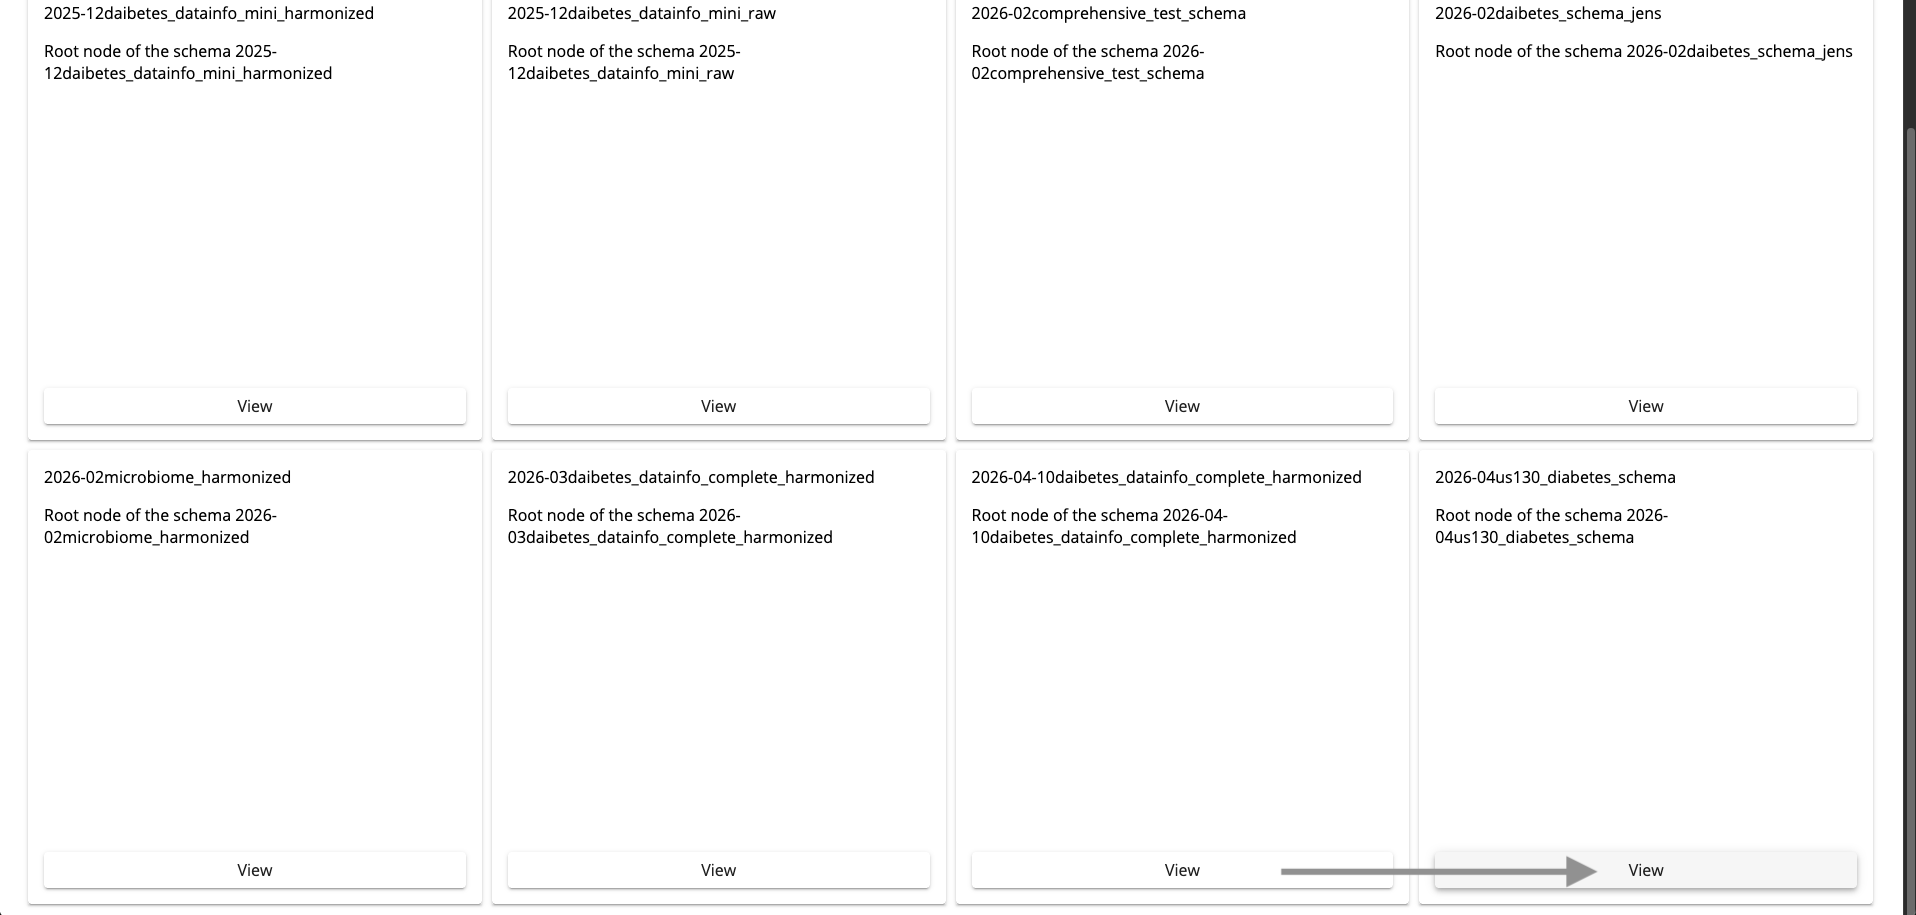
Click New Cohort. A cohort must be linked to a schema, because the schema defines the expected structure, semantic meaning, and validation rules for the cohort data.
Select the schema that matches the data you want to import. For example, a US-130 diabetes dataset should use the corresponding US-130 diabetes schema. Click View on the schema card to continue.
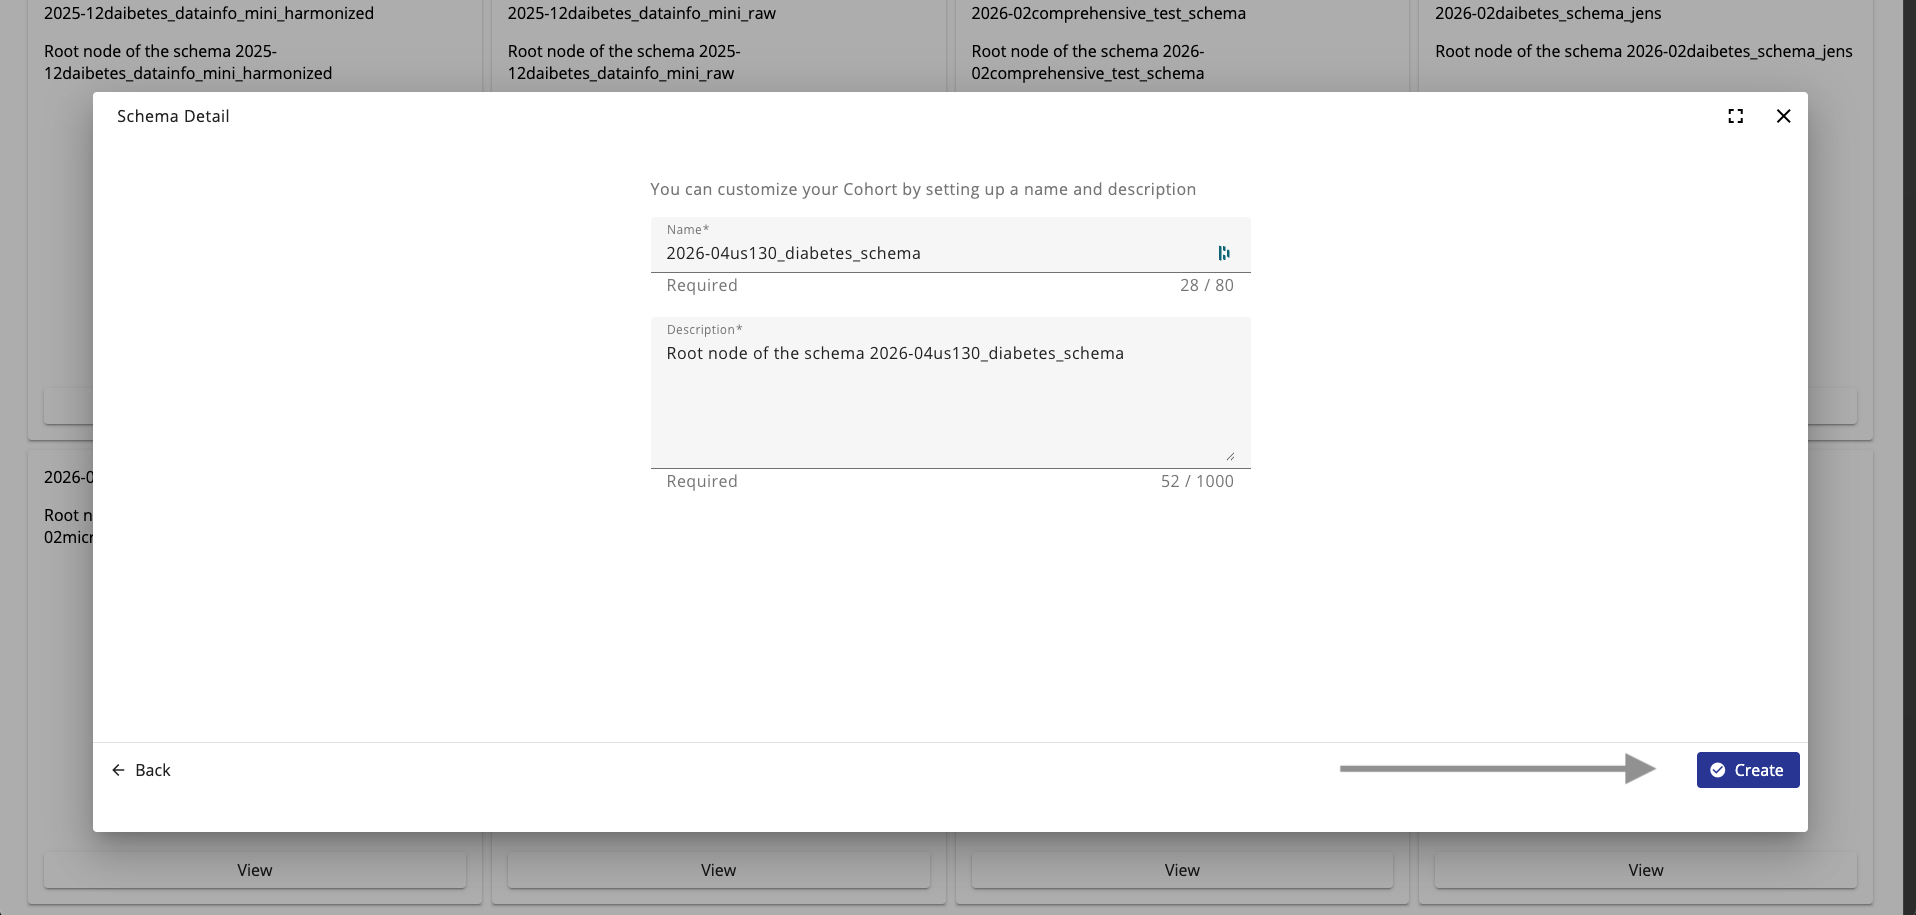
Confirm the cohort name and description. The default values are derived from the selected schema, but you can adjust them to match your local use case. Click Create to create the cohort.
After creation, open the cohort detail page. This page is the central workspace for the local cohort. It provides access to cohort details, schema information, queriability settings, statistics, patients, access permissions, and connector actions.
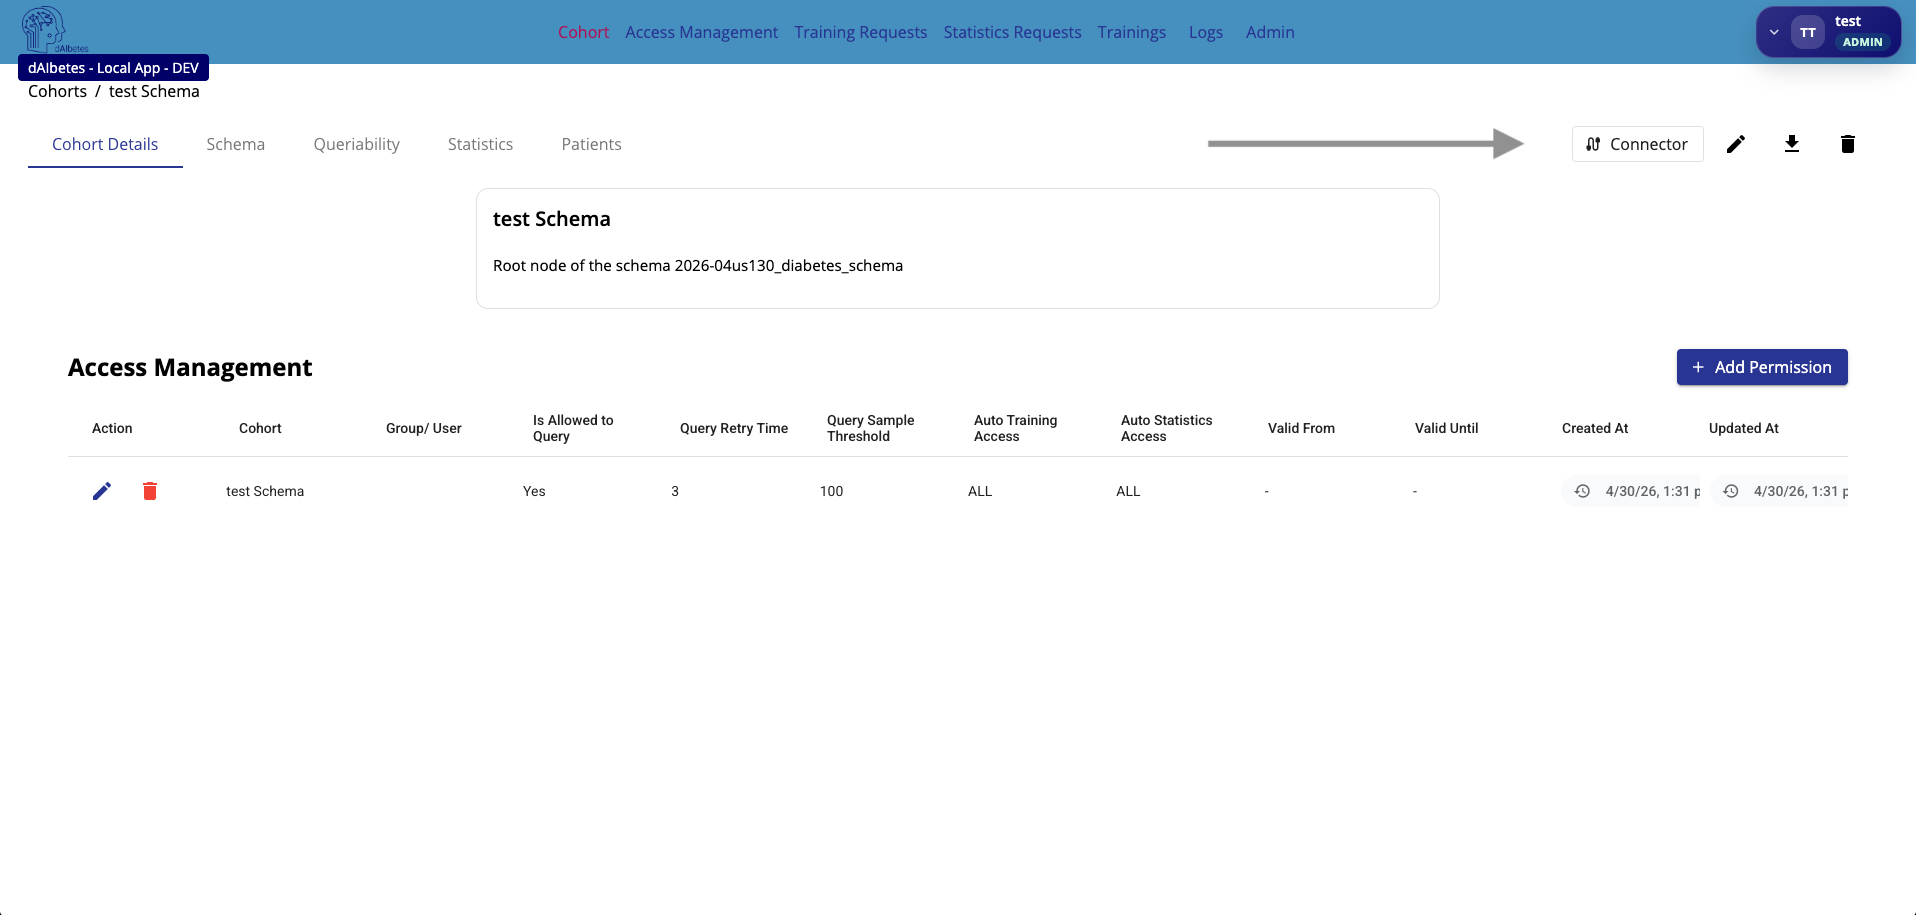
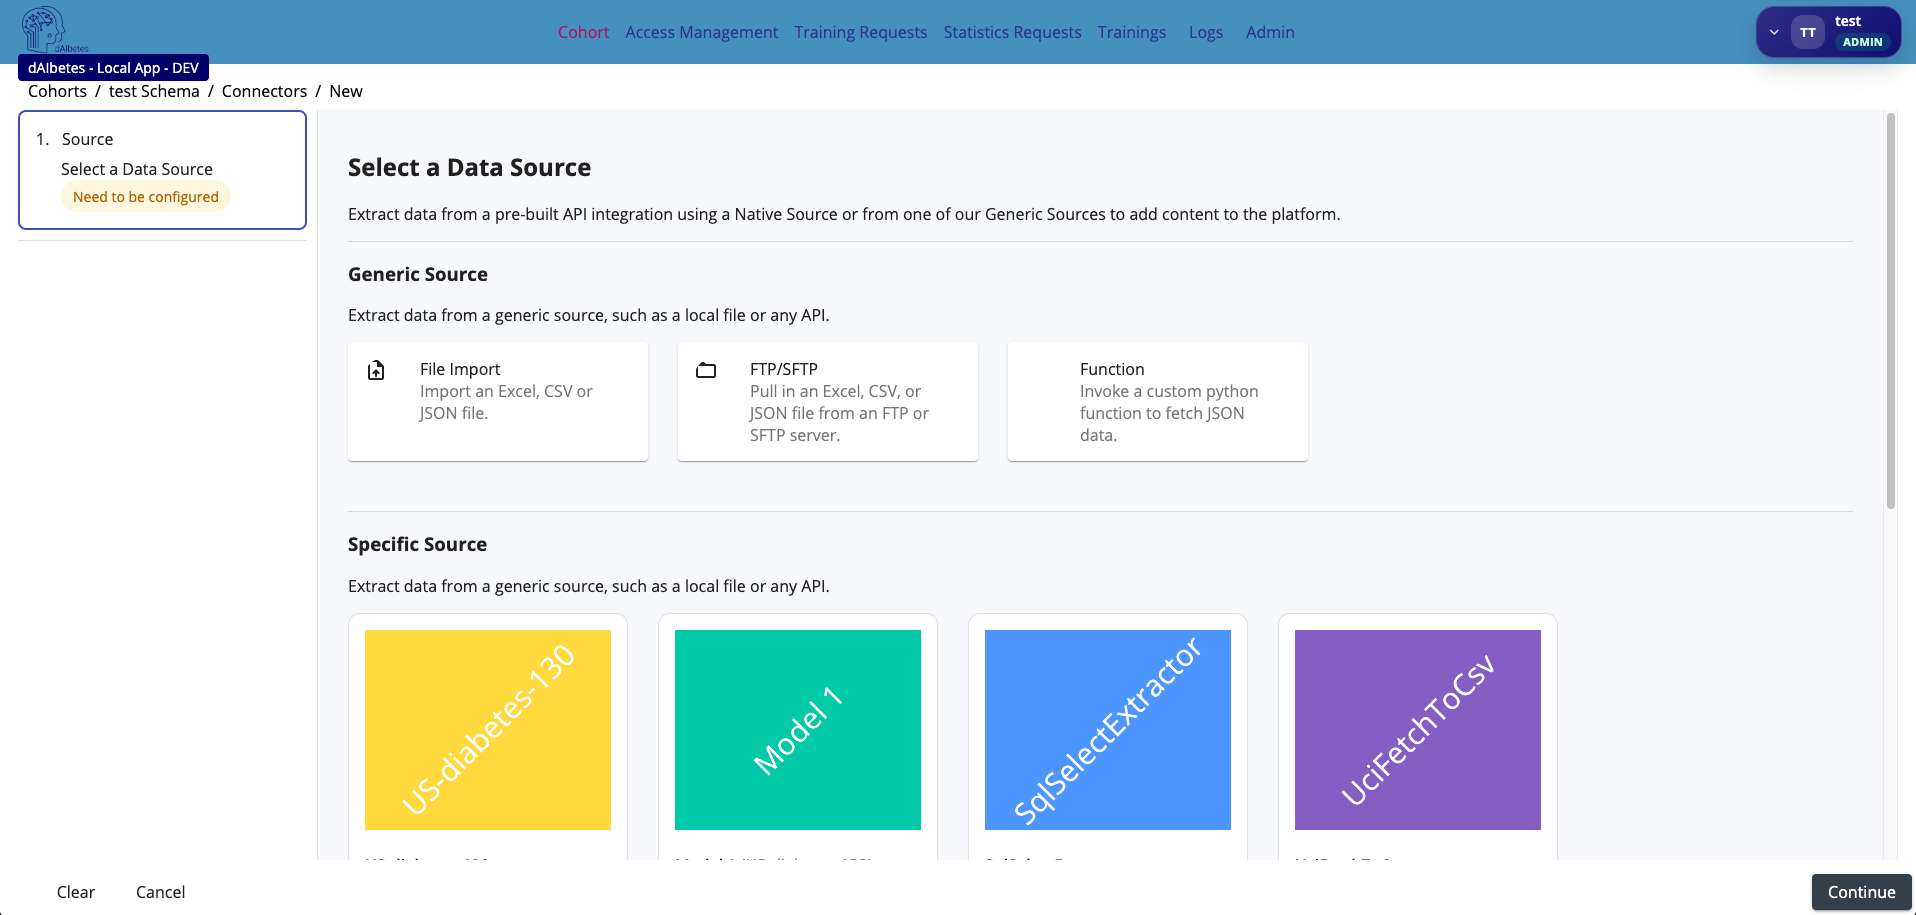
Click Connector to start creating a connector for this cohort. The connector wizard opens and asks you to select the data source. Choose the source type that matches your local data, for example file import, FTP/SFTP, a custom function, or a predefined source.
Step 3 — Upload or Select the Source File
After selecting File Import as the connector source, configure the file import settings.
In this step, you define which local file should be used as the source data for the connector. You can either upload a new file through Main Import or select an existing file from the cohort file library.
For the US-130 example, the source file is a CSV file such as clinic_128.csv.
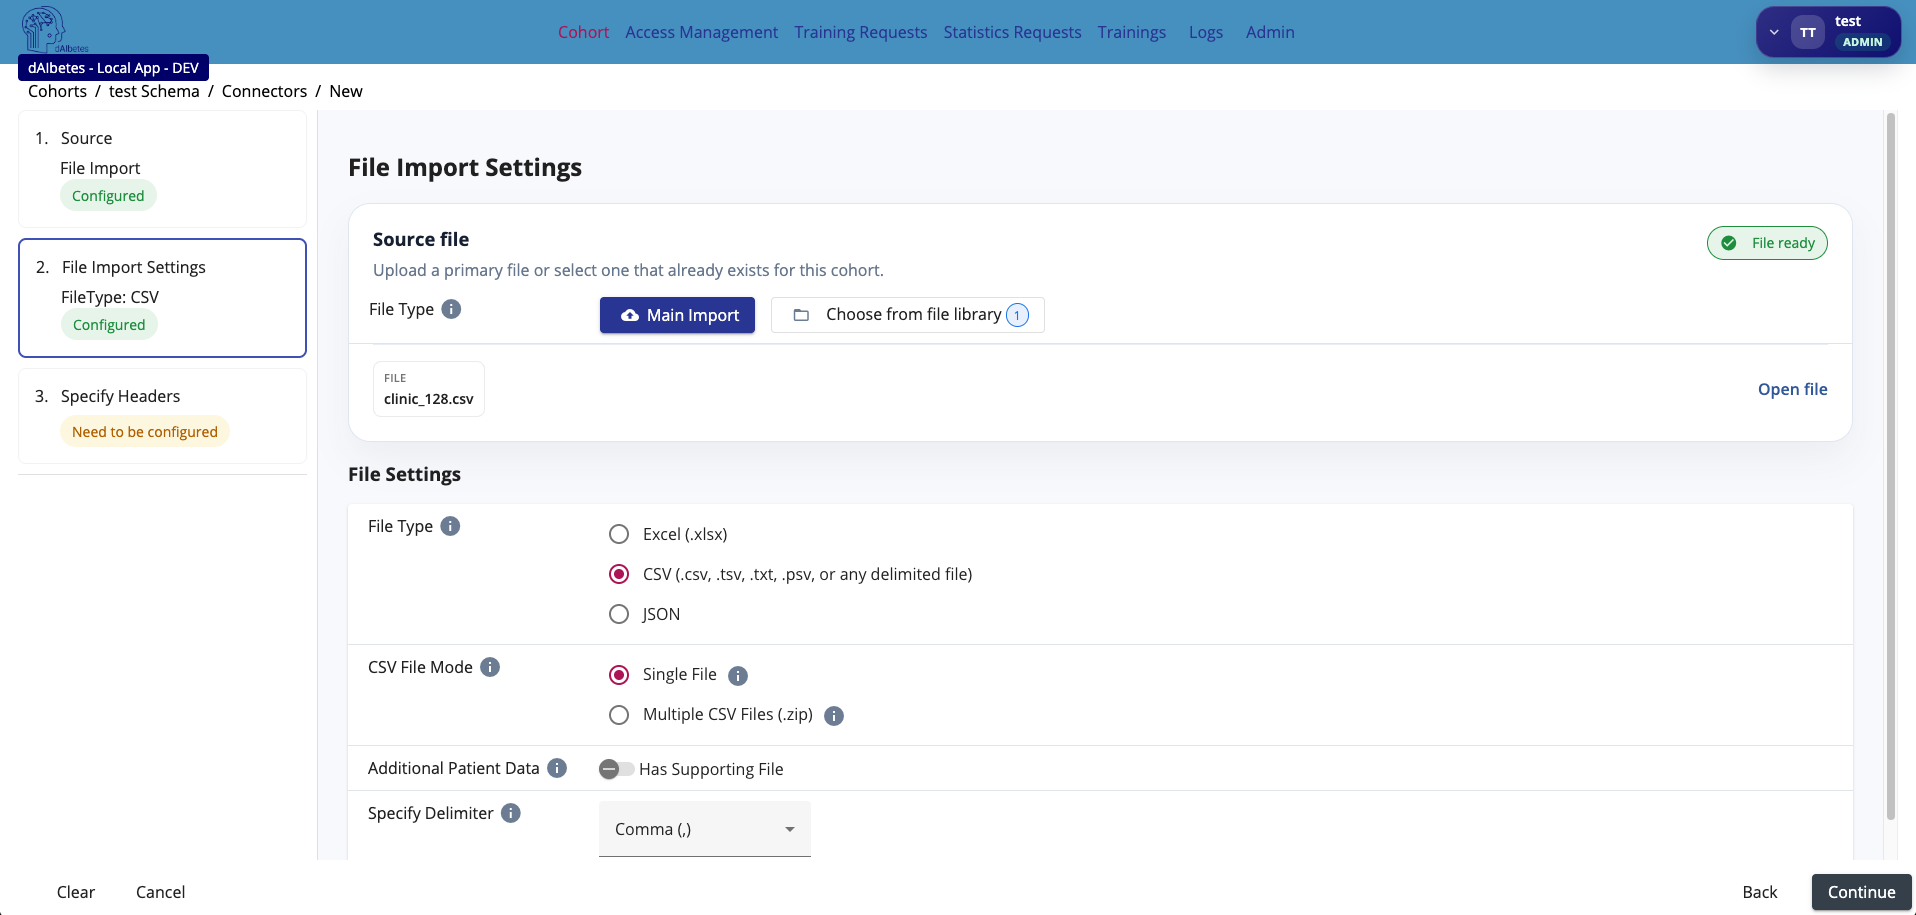
Configure the file settings according to your source file:
| Setting | Description |
|---|---|
| File Type | Select the source format, for example Excel, CSV, or JSON |
| CSV File Mode | Select whether the import consists of a single CSV file or multiple CSV files in a ZIP archive |
| Additional Patient Data | Enable this if the import includes an additional supporting file |
| Delimiter | Select the delimiter used by the CSV file, for example comma, semicolon, tab, or pipe |
For a standard US-130 CSV file, use:
| Field | Value |
|---|---|
| File Type | CSV |
| CSV File Mode | Single File |
| Delimiter | Comma (,) |
The file is handled inside the local clinic environment. It is used as source data for the connector and is not uploaded to the global server as raw patient data.
This step tells the connector how to read the source file. If the file type or delimiter is wrong, later steps such as preview, transformation, and schema mapping will not work correctly.
Step 4 — Specify Headers and Inspect the Preview
After the file settings are configured, continue to the header preview step.
The connector loads the file and displays a table preview. This allows you to verify that the source file was parsed correctly and that the detected columns match the expected data structure.
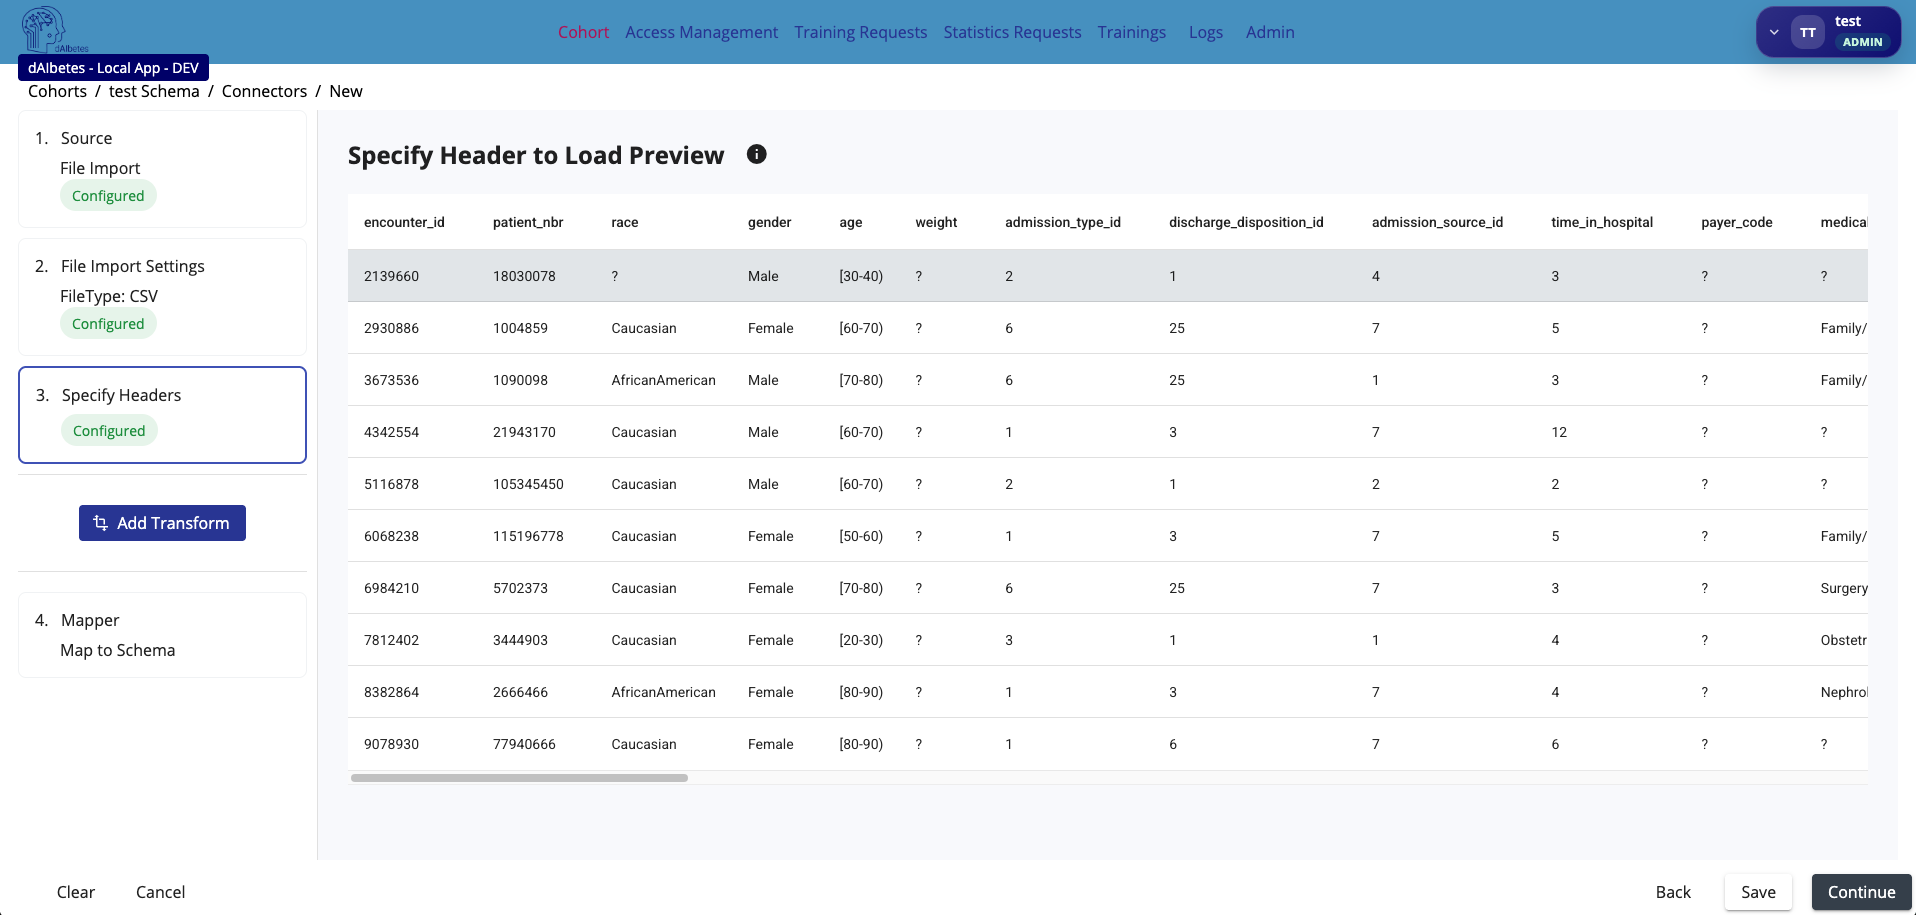
Check the preview carefully:
| What to check | Why it matters |
|---|---|
| Column names | These names are later mapped to schema fields |
| Row alignment | Values should appear under the correct column headers |
| Missing values | Missing or placeholder values may need transformation |
| Unexpected symbols | Values such as ?, empty strings, or custom missing-value codes may need cleanup |
| Data consistency | Numeric, categorical, and text values should look as expected |
In the US-130 example, several columns contain ? values. These are not real clinical values. They are placeholders for
missing values and should usually be converted before mapping the data to the schema.
The preview is not only a visual check. It helps you decide whether transformations are needed before schema mapping.
Do not continue directly to mapping if the preview contains placeholder values, malformed columns, or incorrectly parsed headers. Fix the import settings or add transformations first.
Step 5 — Add Data Transformations
Before mapping the source file to the schema, you can add transformations. Transformations clean or normalize the source data so that it better matches the expected schema.
Click Add Transform to add a transformation step.
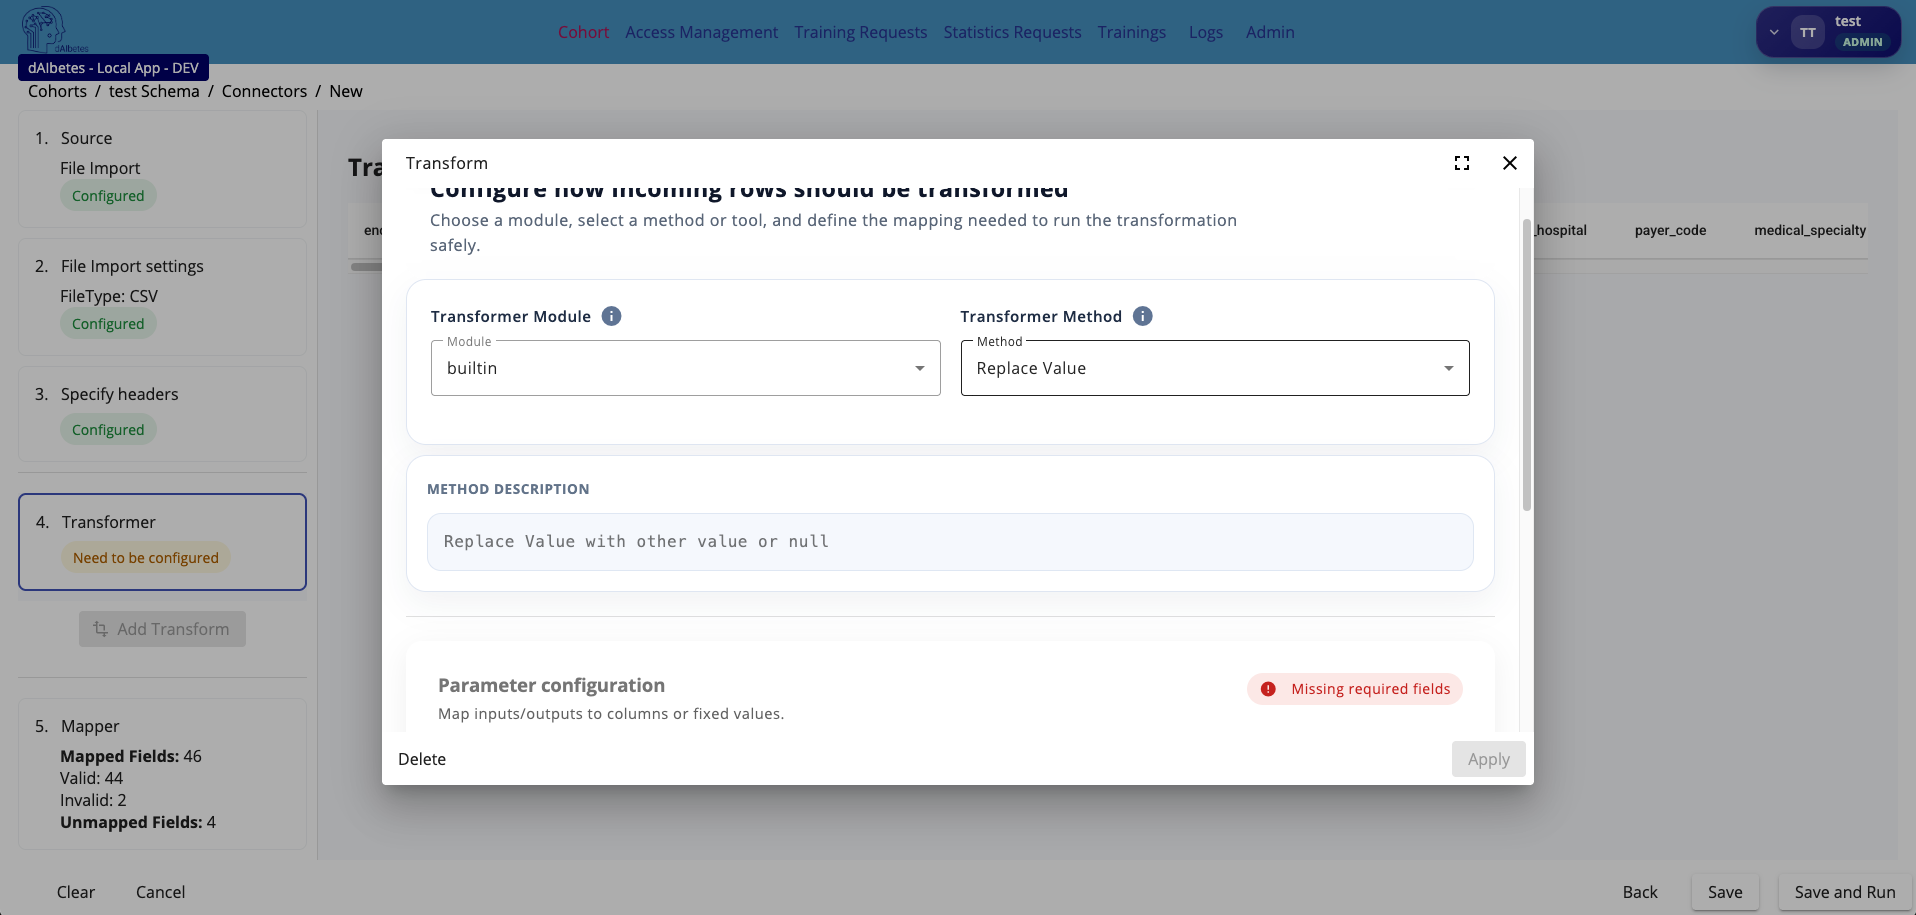
A transformation consists of two parts:
| Part | Description |
|---|---|
| Transformer Module | The module that provides the transformation logic, for example builtin |
| Transformer Method | The concrete transformation method, for example Replace Value |
In the example, the selected transformation is Replace Value. This method replaces a source value with another value
or with null.
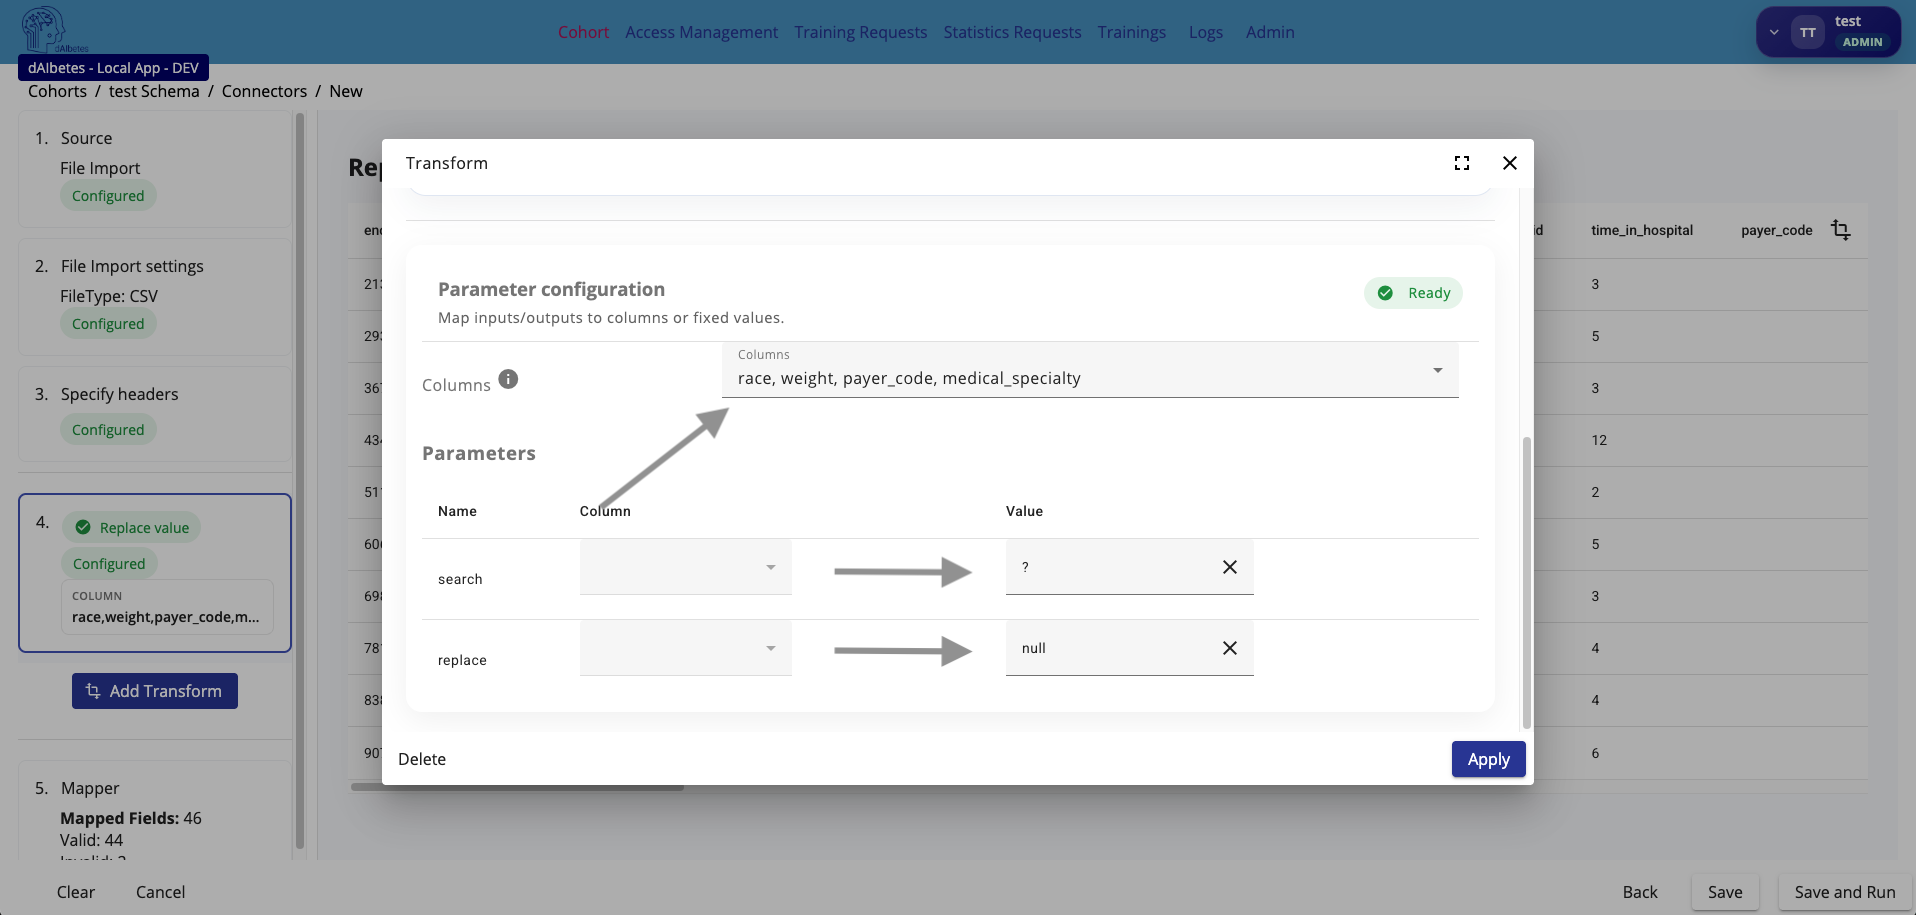
For the US-130 example, this is useful because missing values are encoded as ?. The transformation can replace ?
with null in selected columns such as:
raceweightpayer_codemedical_specialty
The parameter configuration defines:
| Parameter | Meaning |
|---|---|
| Columns | The columns to which the transformation should be applied |
| search | The value to search for, for example ? |
| replace | The replacement value, for example null |
After applying the transformation, the preview updates and shows the transformed result.
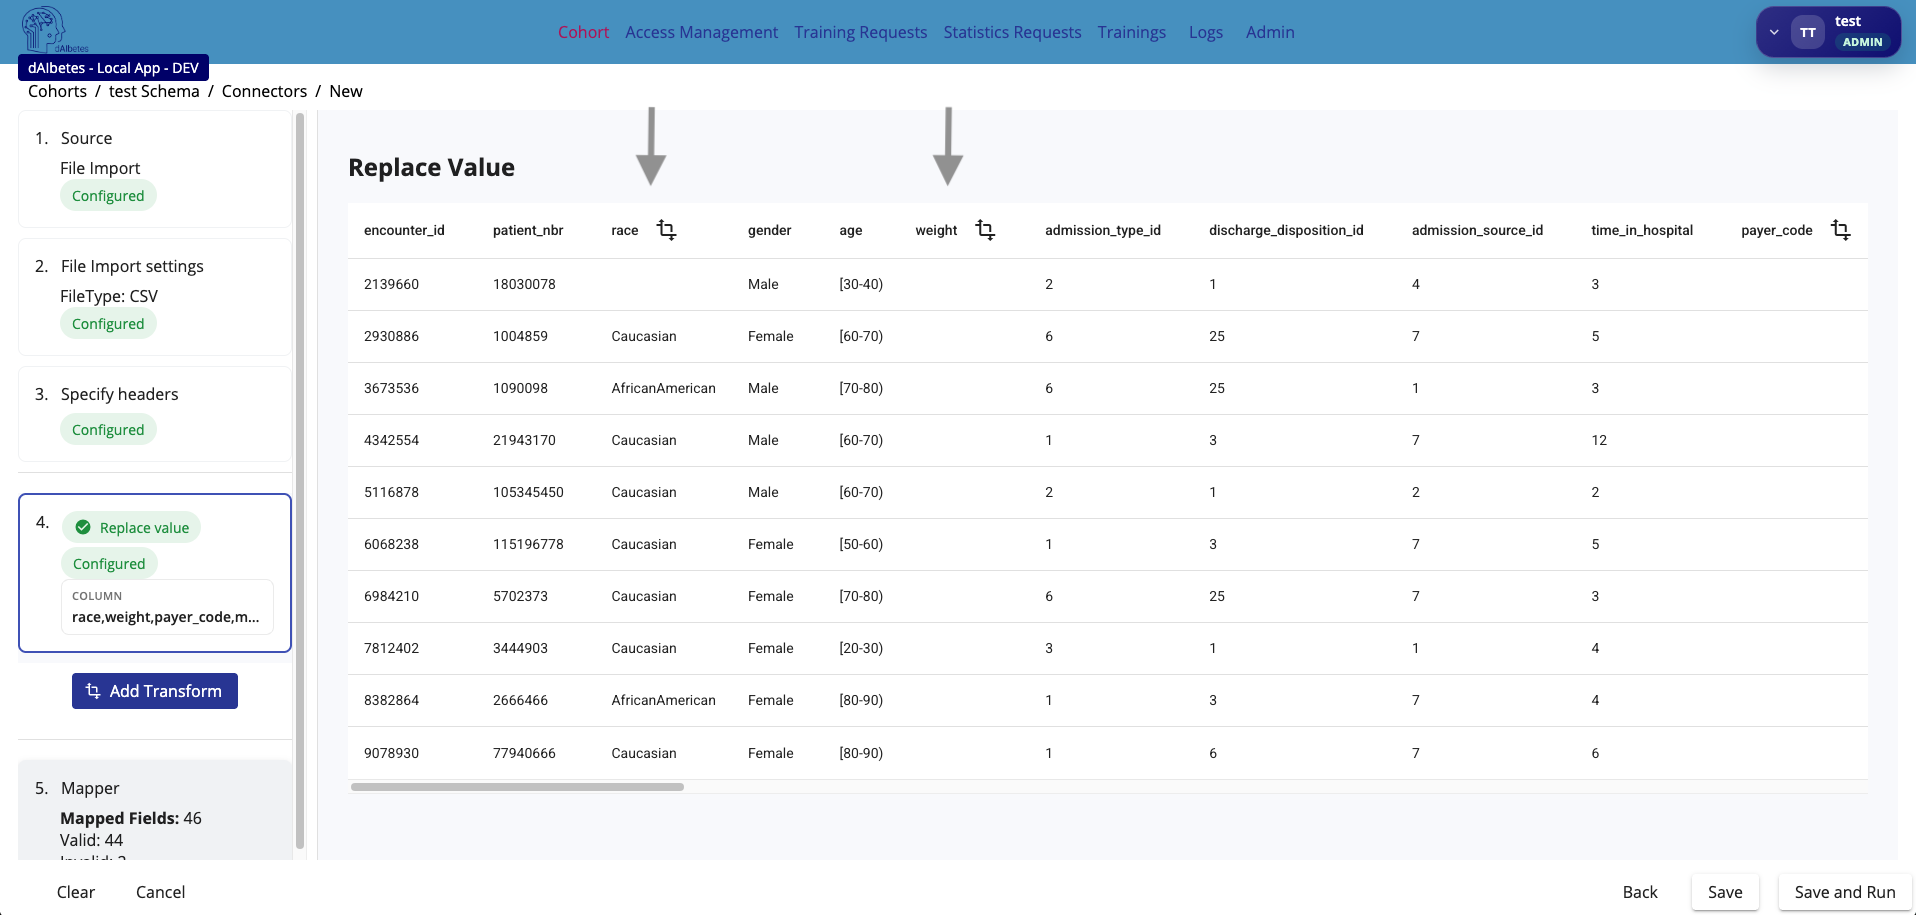
The transformation marker next to the affected columns indicates that these columns are modified by the transformation step.
Transformations are applied before schema mapping. They should be used to make the source data cleaner, more explicit, and easier to validate.
Use transformations to remove source-specific quirks before mapping. A common example is replacing placeholder values
such as ?, NA, N/A, or empty strings with proper null values.
Step 6 — Map Source Fields to the Schema
After the source file is readable and cleaned, map the source columns to the selected schema fields.
The mapping step connects local source headers to the semantic schema used by the cohort. This is the central harmonization step of the connector.
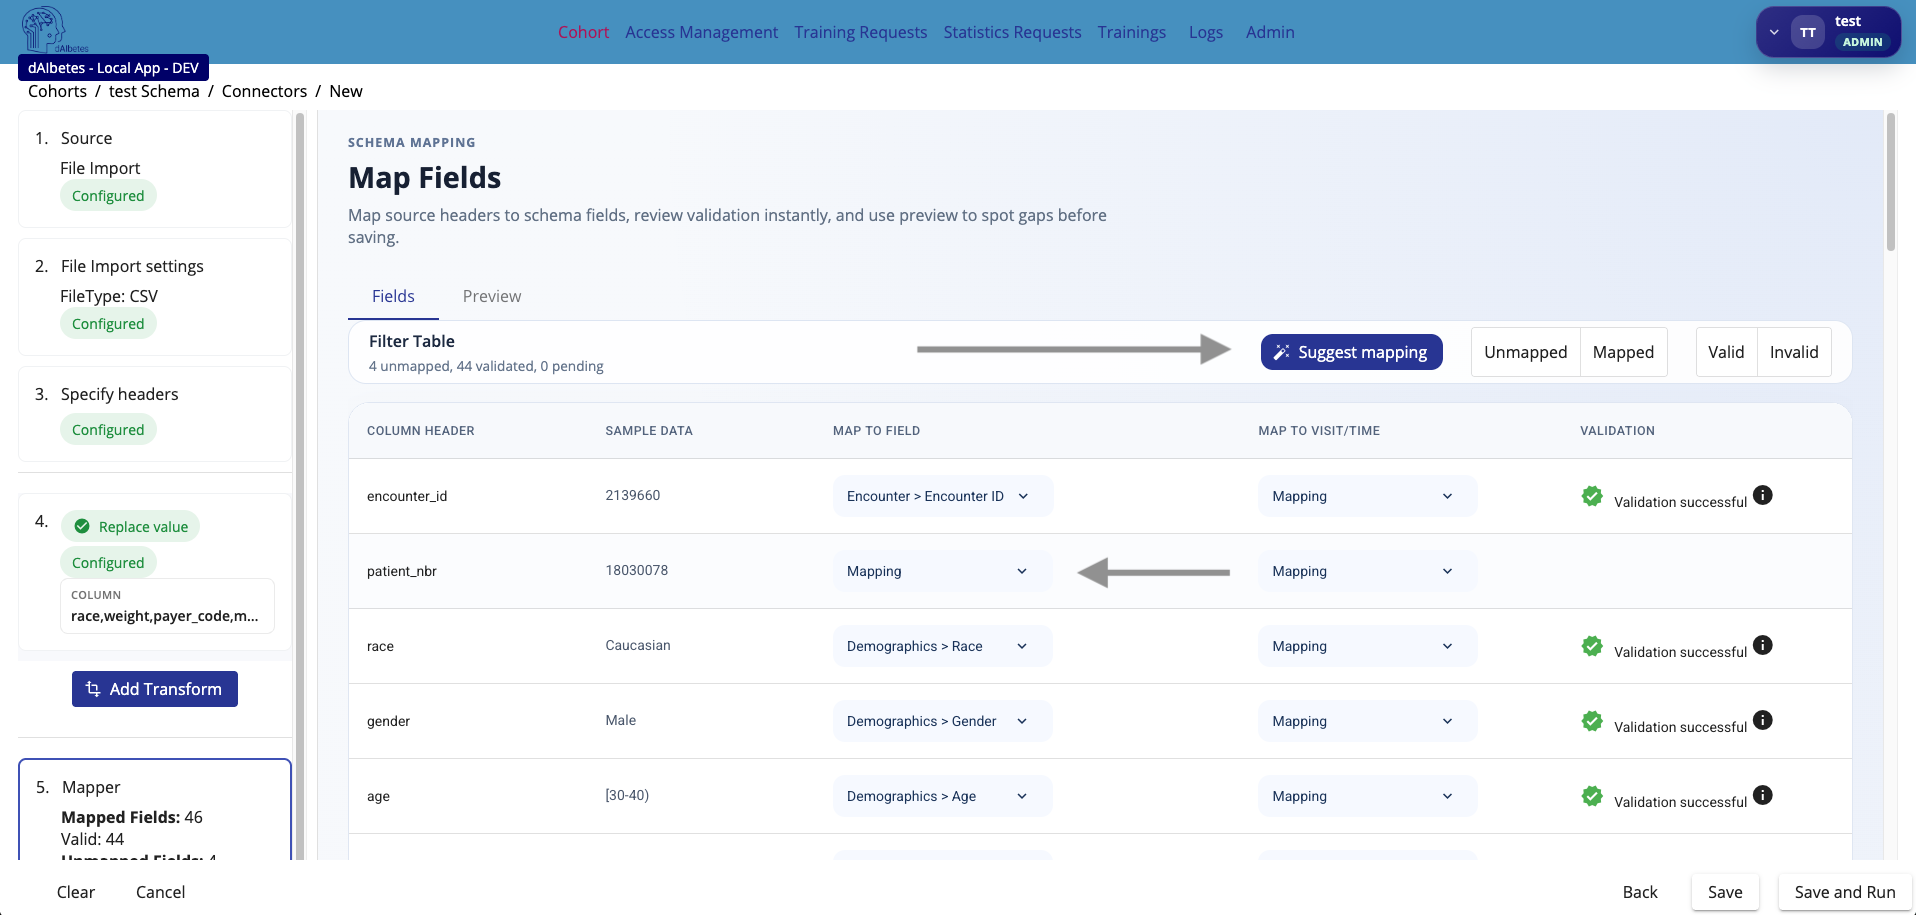
The mapping table shows:
| Column | Description |
|---|---|
| Column Header | The original column name from the source file |
| Sample Data | Example values from the source file |
| Map to Field | The schema field that should receive this source column |
| Map to Visit/Time | Optional visit or time mapping if the schema supports longitudinal data |
| Validation | Validation status after mapping |
You can map fields manually or use Suggest mapping to let the system propose mappings based on column names and schema fields.
The validation status helps identify whether the selected mapping is compatible with the schema. A successful validation means that the source field can be mapped to the selected schema field according to the expected datatype and constraints.
Mapping is where local data becomes semantically interoperable. The original source column may be named differently at each clinic, but after mapping, it points to the same schema-defined concept.
A connector is only useful if the mapping is correct. Review suggested mappings manually, especially for clinically meaningful columns such as diagnosis, age, gender, outcome, medication, or readmission labels.
Step 7 — Save the Connector
When the mapping is complete and the validation results look correct, save the connector.
Click Save. A dialog asks for the connector name and description.
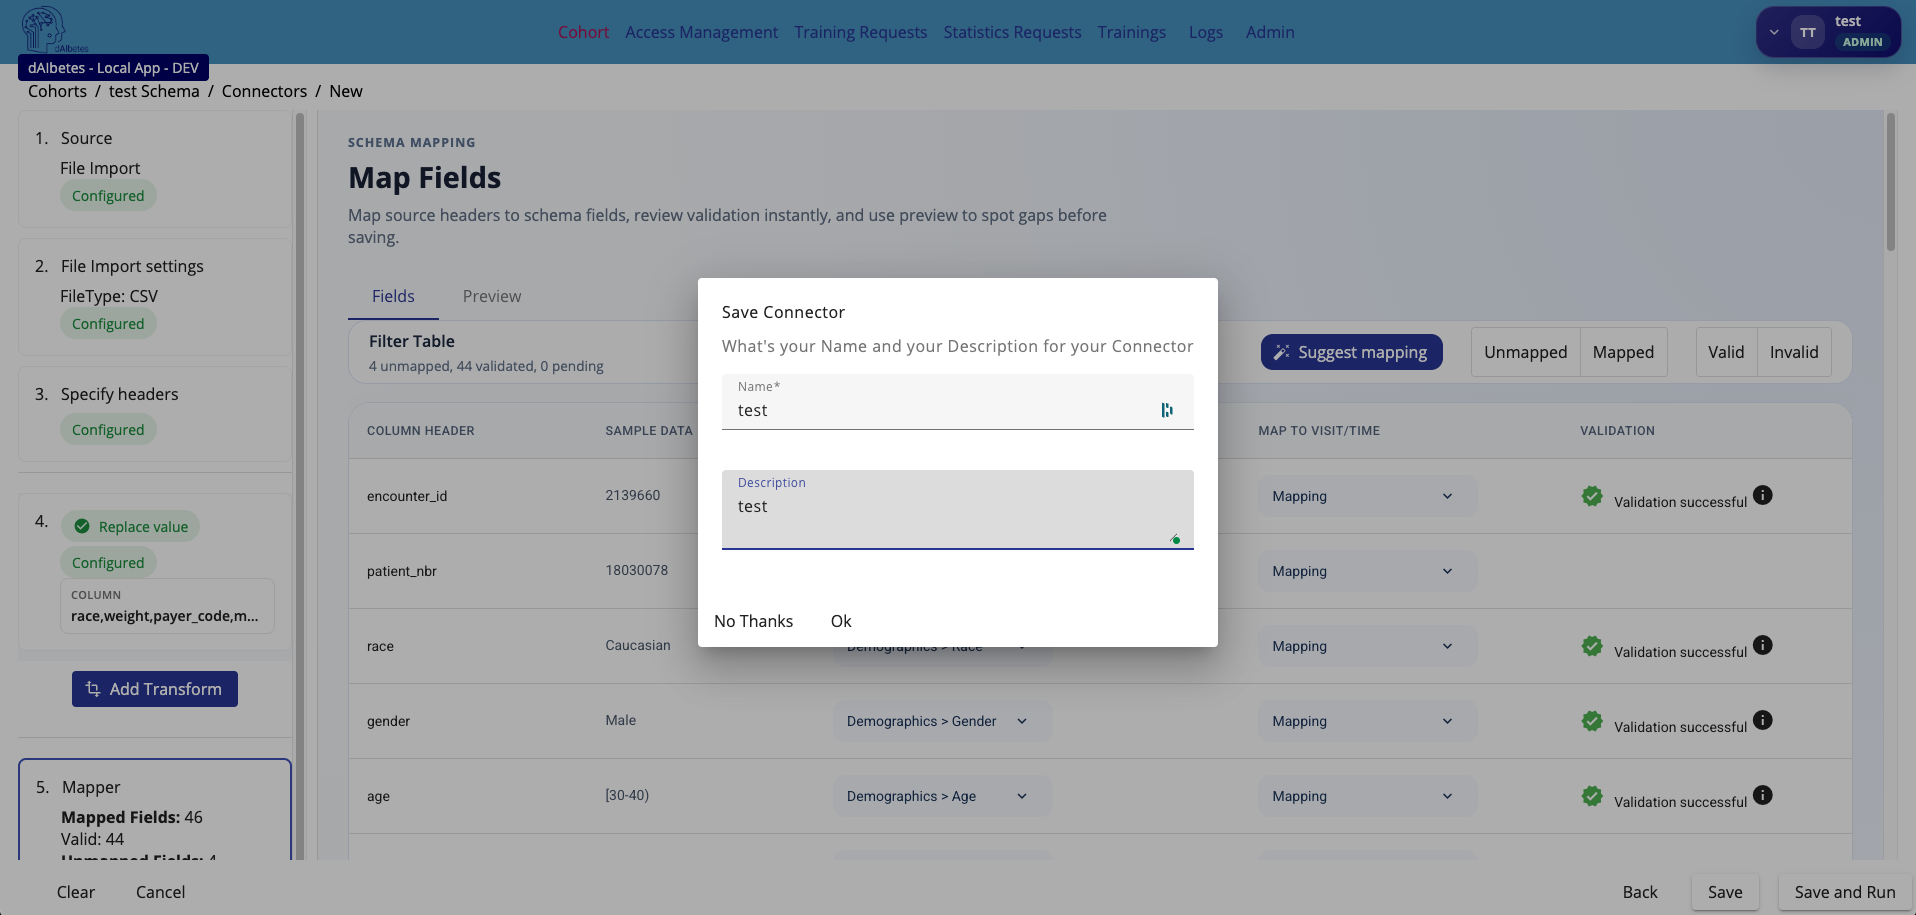
Use a clear name and description so that other local administrators can understand what the connector imports.
Example:
| Field | Example |
|---|---|
| Name | US-130 CSV Import |
| Description | Imports and harmonizes the US-130 diabetes readmission CSV file |
After saving, the connector detail page opens. It shows a connector summary with the connector name, description, and source type.
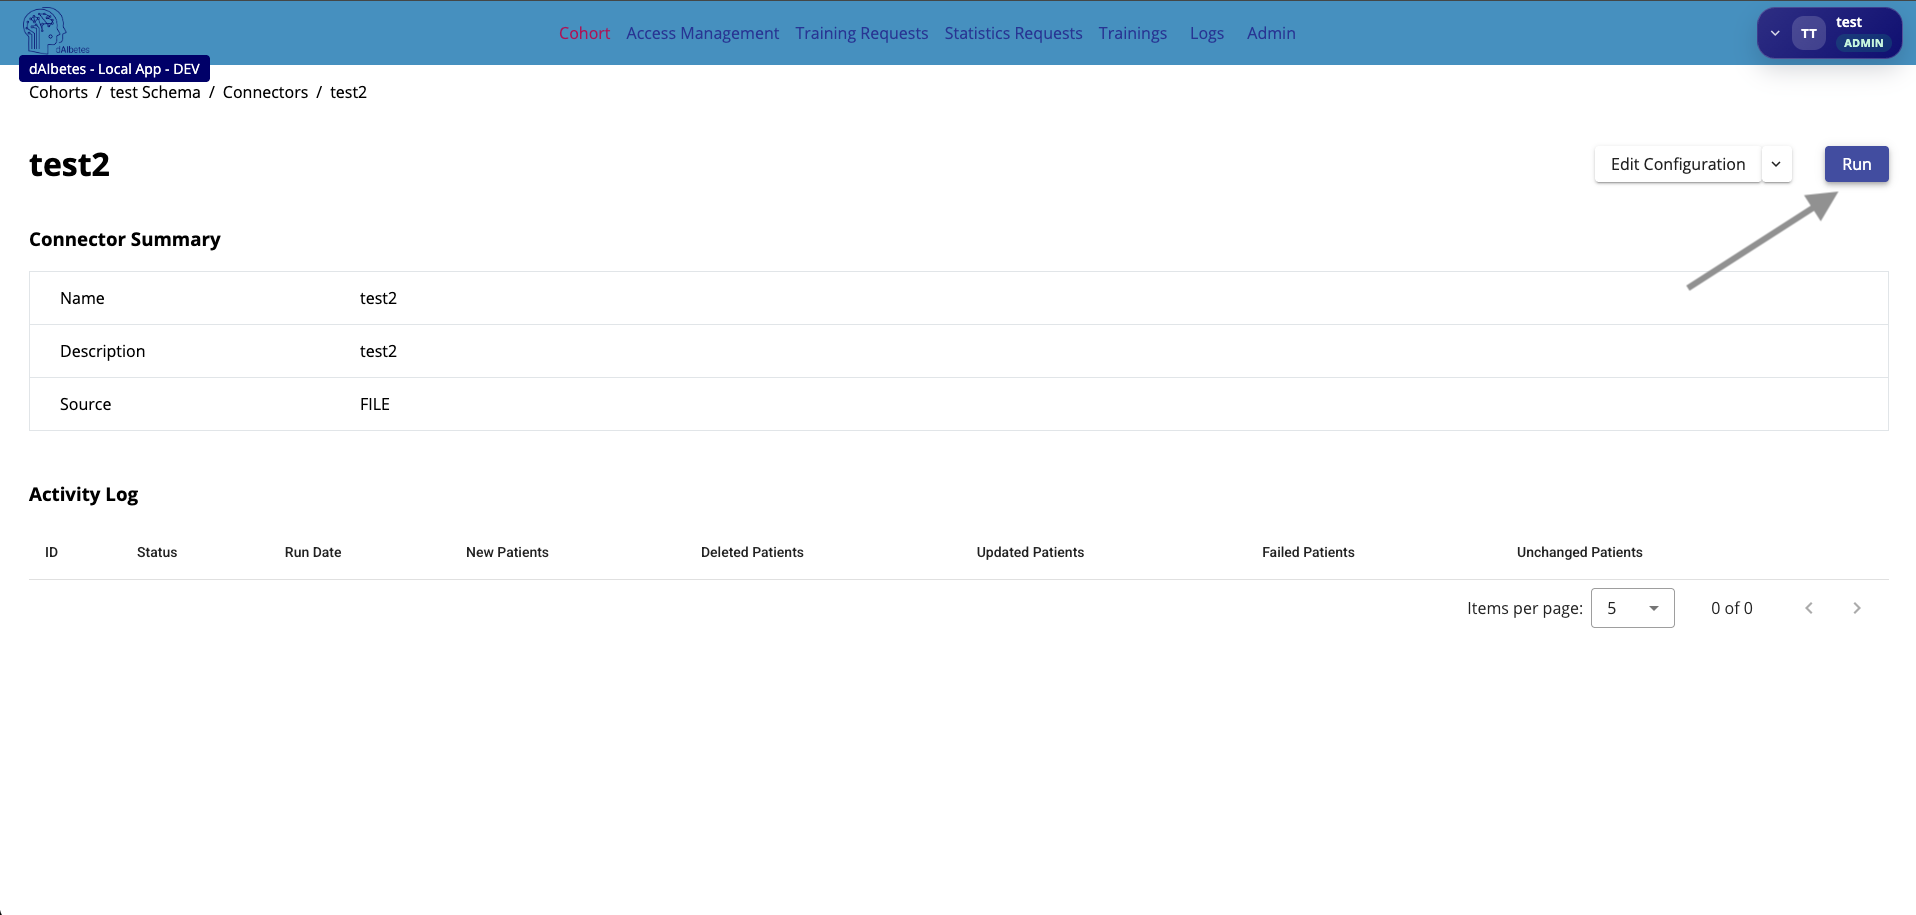
The connector is now configured, but it has not necessarily imported data into the cohort yet. To apply it, you need to run it.
Saving stores the connector configuration. Running the connector executes the ETL process and writes the imported, transformed, and mapped data into the local cohort.
Saving and running are separate actions. Save first to persist the configuration, then run the connector to import or update cohort data.
Step 8 — Run the Connector
On the connector detail page, click Run.
The run dialog lets you choose how the connector should be executed.
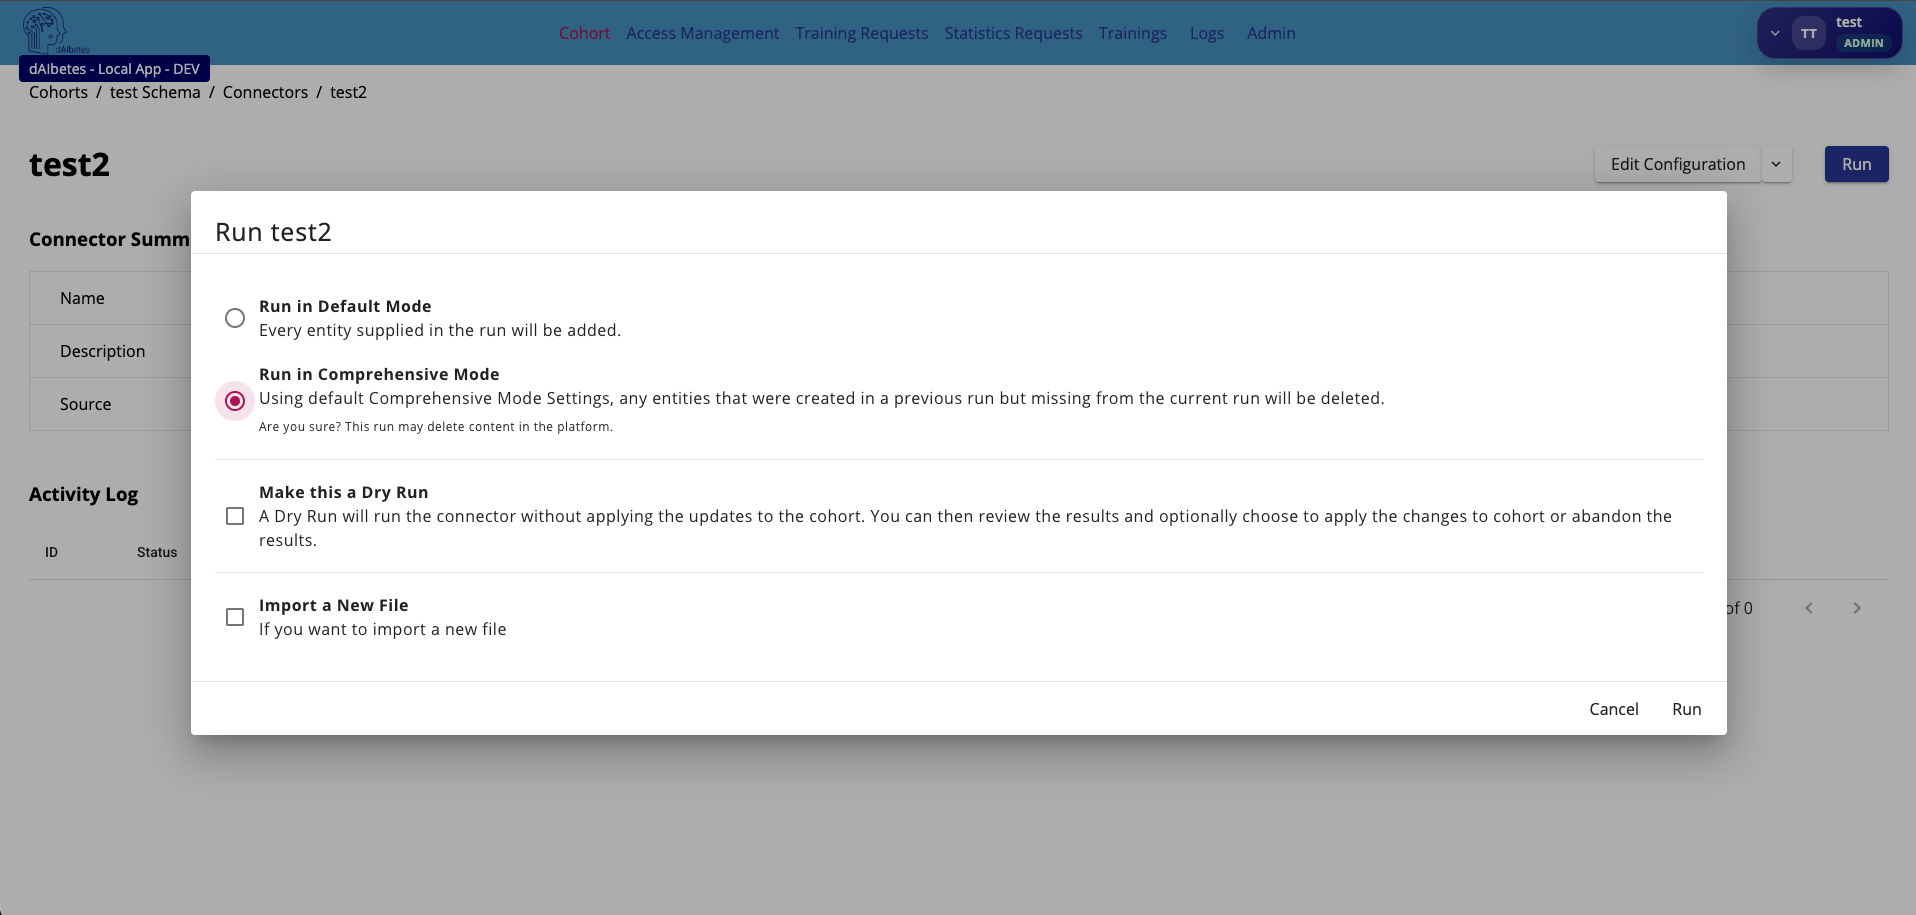
Available run options include:
| Option | Description |
|---|---|
| Run in Default Mode | Adds all entities supplied by the current connector run |
| Run in Comprehensive Mode | Treats the current run as the complete source state; entities that existed before but are missing from the current run may be deleted |
| Make this a Dry Run | Runs the connector without applying changes to the cohort |
| Import a New File | Allows a new file to be selected for this connector run |
Use Default Mode when you want to add or update data without treating missing rows as deletions.
Use Comprehensive Mode when the source file represents the complete current state of the cohort. Be careful: this mode can remove entities that are no longer present in the current import.
Use Dry Run when you want to test the connector without changing the cohort. This is recommended when you are validating a new connector configuration.
Comprehensive Mode can delete content from the local cohort if previously imported entities are missing from the current run. Use it only when the imported file is intended to represent the full current dataset.
For new connectors, start with a dry run whenever possible. Once the result looks correct, run the connector again without dry-run mode to apply the data to the cohort.
Step 9 — Review the Connector Run
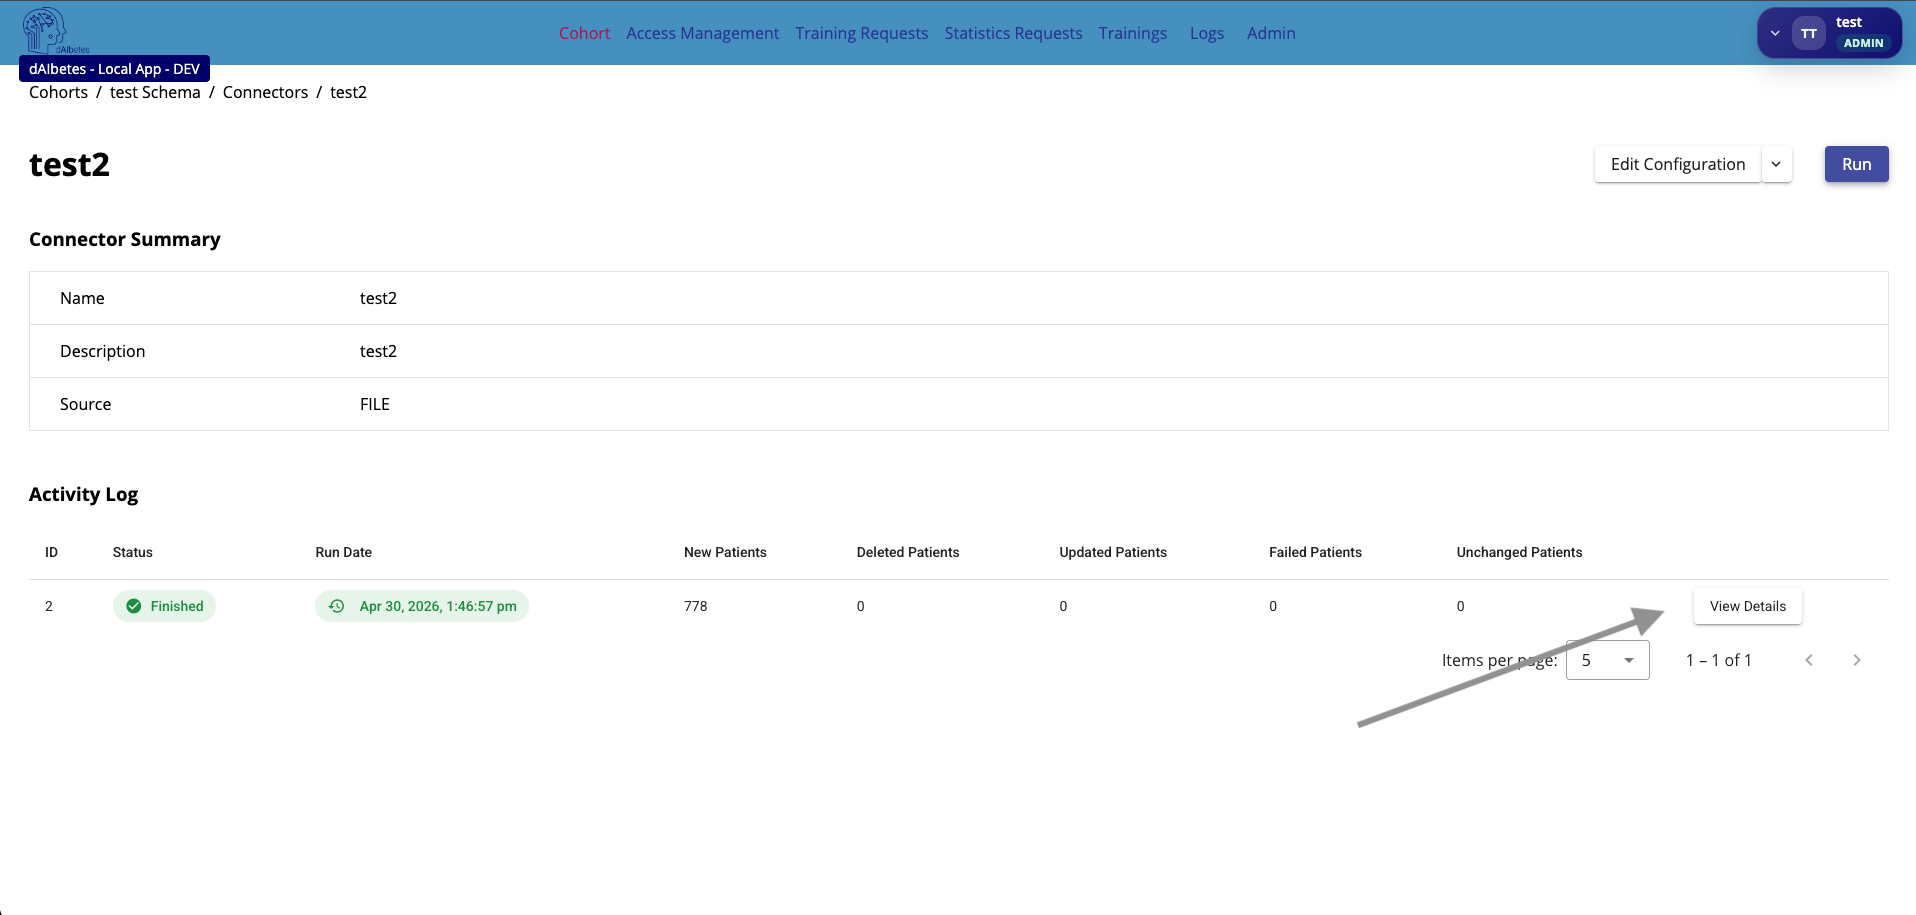
After the connector has run, the connector detail page shows the run in the Activity Log. Click View Details to inspect the run result.
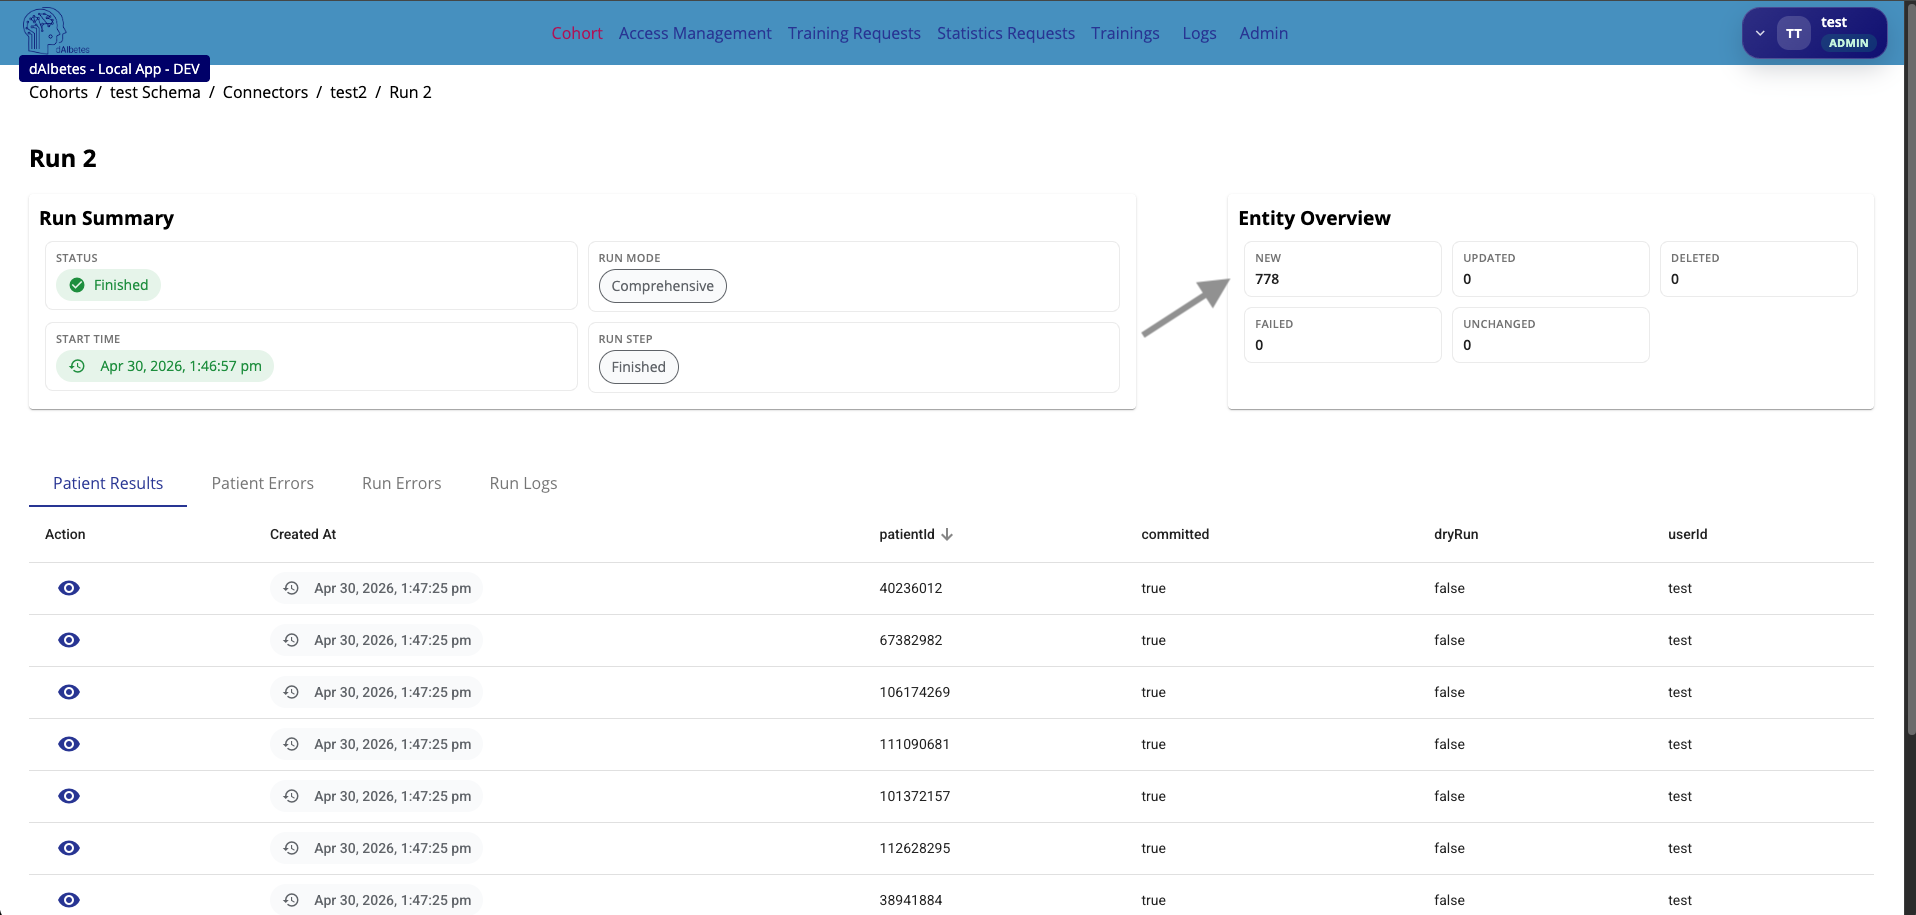
The run detail page gives you an execution-level summary of the ETL process. It shows whether the run finished successfully, which run mode was used, when the run started, and how many entities were created, updated, deleted, failed, or left unchanged.
| Area | Description |
|---|---|
| Run Summary | Shows the run status, start time, run mode, and current run step |
| Entity Overview | Summarizes how many entities were newly created, updated, deleted, failed, or unchanged |
| Patient Results | Lists the patient-level results created by this connector run |
| Patient Errors | Shows patient-level import or validation errors |
| Run Errors | Shows execution-level connector errors |
| Run Logs | Shows logs generated during the connector run |
In the example, the connector finished successfully in Comprehensive mode and created 778 new entities without failed, updated, deleted, or unchanged entities.
The run detail page is the audit view for a connector execution. Use it to confirm that the connector behaved as expected before using the cohort for statistics, queries, or federated training.
A successful connector run is not only defined by the green status badge. Always compare the entity counts with what you expected from the source file.
Step 10 — Review Imported Patients in the Cohort
After a successful connector run, return to the cohort detail page and open the Patients tab.
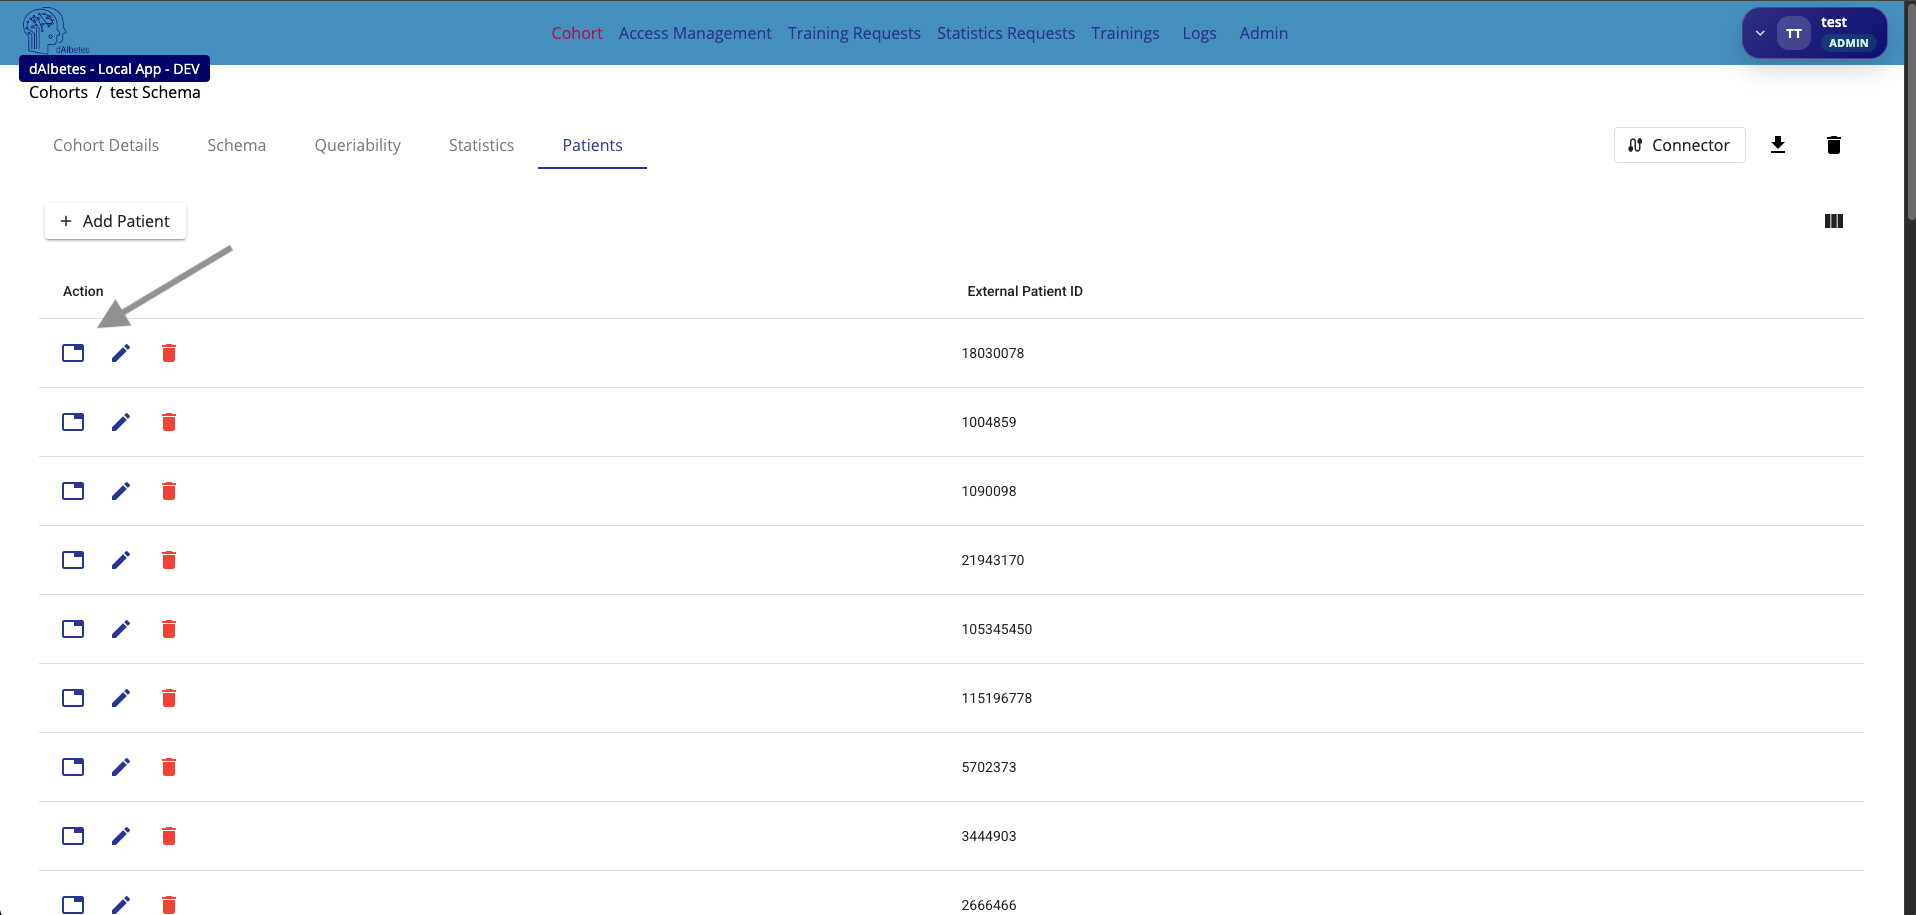
The patients view shows the records that are now available inside the local cohort. Each row represents an imported patient entity and shows the external patient identifier. You can use the action buttons to open, edit, or delete a patient record.
Open a patient record to inspect the imported and harmonized data.
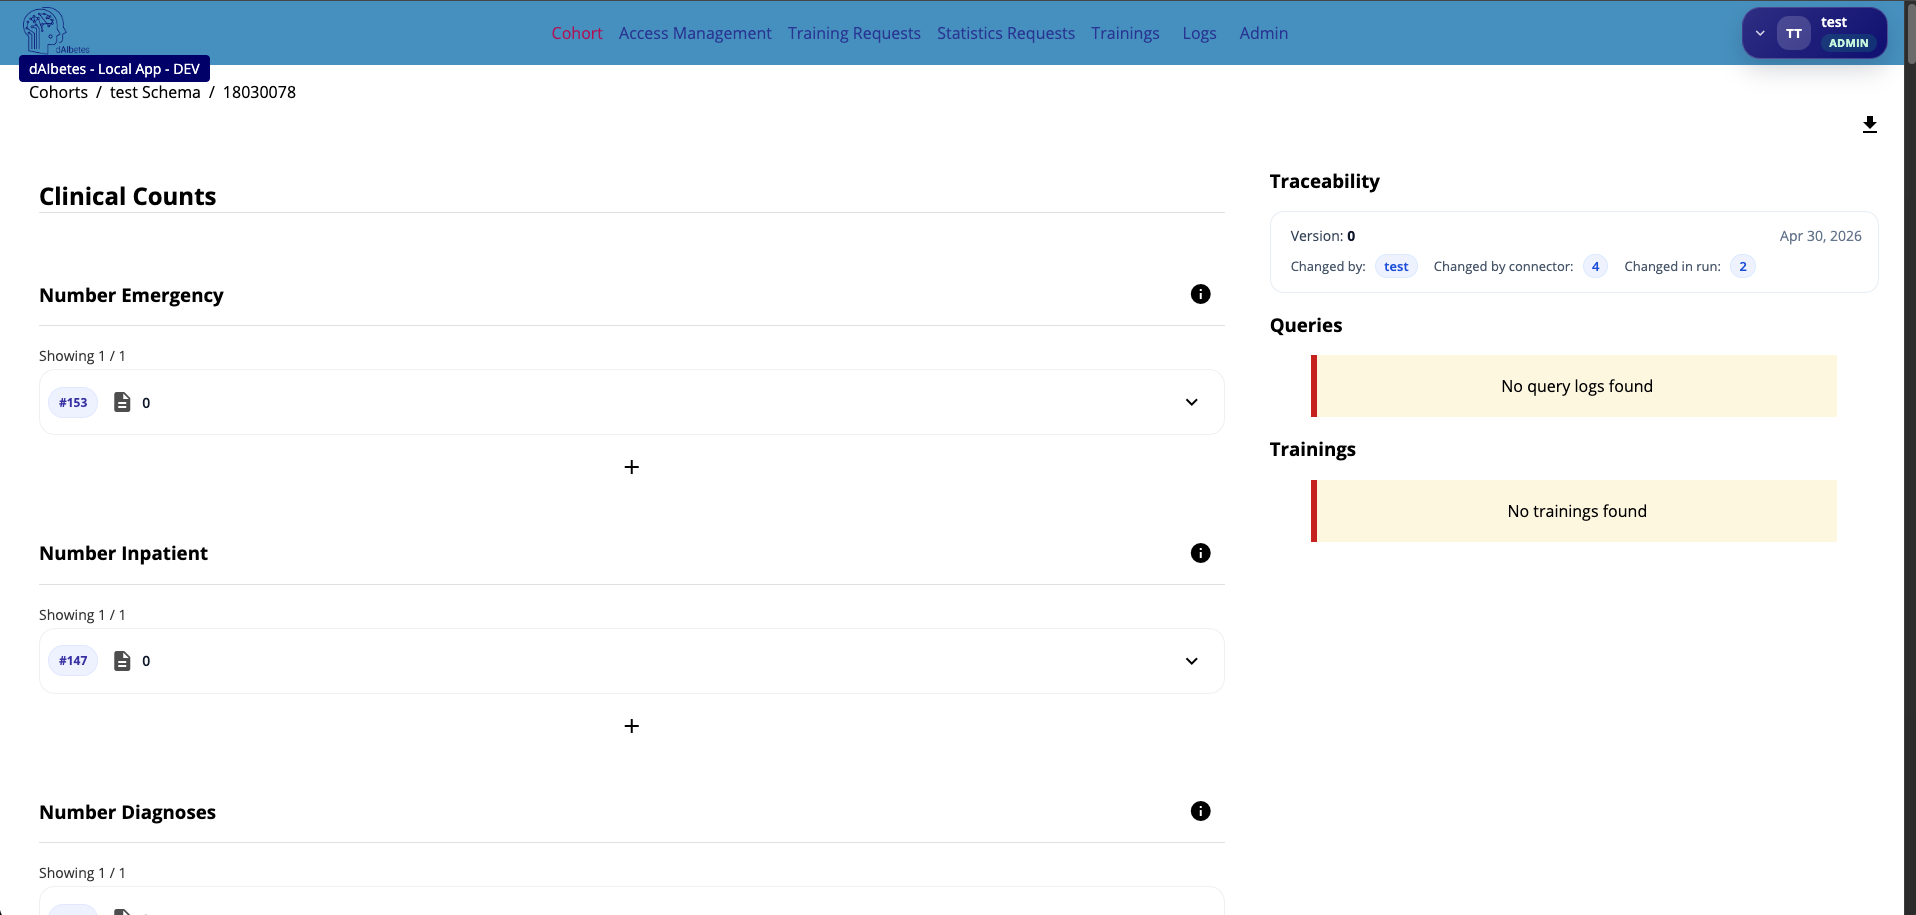
The patient detail page shows the schema-based clinical values stored for the selected patient. On the right side, the Traceability panel shows where the current patient version came from, including the connector and run that changed it. This makes imported data auditable and helps verify which connector execution created or modified a patient record.
Use this view to verify that:
| Check | Description |
|---|---|
| Patients were created | The expected number of patients appears in the cohort |
| External patient IDs are correct | Imported identifiers match the source file |
| Fields were mapped correctly | Source values appear under the intended schema fields |
| Missing values were handled correctly | Placeholder values such as ? were transformed into proper null values |
| Datatypes are valid | Numeric, categorical, boolean, and text fields match the schema expectations |
| Clinical meaning is preserved | Values are attached to the correct ontology-backed schema concepts |
| Traceability is available | The patient record shows which connector and run created or changed it |
The patient detail page confirms the final result of the connector. It shows the data after file import, transformation, schema mapping, validation, and persistence into the local cohort.
Always inspect a few imported patients after the first connector run. This is the fastest way to catch wrong mappings, missing transformations, or schema misunderstandings before the cohort is used for statistics, queries, or federated learning.
Summary
In this walkthrough, you created a local connector for a cohort.
The connector workflow followed the local ETL process:
- Select a data source.
- Upload or select the source file.
- Configure file parsing.
- Preview the source headers.
- Add transformations where needed.
- Map source fields to schema fields.
- Save the connector.
- Run the connector.
- Review the activity log.
- Inspect the imported cohort patients.
The key idea is that the connector transforms local clinic data into the cohort schema while keeping the raw source data local. Once the connector has successfully run, the cohort can be used for local statistics, controlled querying, and federated training workflows.